Atlas · User Manual
Settings
Find personal, organisation and AI administration settings.
Last edited:
Find the setting your role can manage
Choose a task first. Use an account with access to that feature in the active organisation; each linked procedure lists its prerequisites.
- Inspect your personal settings
- Check organisation membership
- Understand effective permissions
- Connect your mailbox
Check the result: You can distinguish personal settings from organisation administration and platform-only controls.
If you get stuck: If a setting is unavailable, check your role in the active organisation. Confirm the effect before changing membership, security, billing or organisation settings; some controls require a platform operator.
Open Settings and inspect your account
Screen: /settings/personal
Use case: Find the right settings page and understand your access.
Before you begin: Use an account with access to this feature in the correct organisation.
How to do it
- Open the account menu at the bottom of the left rail (its own button, below the group icons) and choose Settings. Settings opens in its own shell with a Back control in place of the application.
- Read the left sections for your role. A rep sees ACCOUNT (Personal), ORGANISATION (Organisation, Security, Labels, Integrations), AI & AGENTS (AI configuration) and SALES (Customer management). An admin or owner also sees BILLING & USAGE (Billing, Subscription), a fuller AI & AGENTS (Model provider, Agent quality, AI configuration, Roles & skills), KNOWLEDGE (Document review, Learned lessons, Human feedback, Agent logs — the last of these was Trace & evaluation under AI & agents) and SALES (Customer management, Customer ownership, Engagement strategy); an owner's SALES also lists Quotation rules.
- In Personal inspect the displayed Email, Role and Organisation ID; these fields are read-only. Under My memory, choose Manage my memory to review and manage what Atlas remembers about how you work.
- Use EN/中文 at the bottom of the settings sidebar to change language. Use Back to return to the application.
- If a settings page or Save control is absent, ask the organisation administrator about your effective permissions instead of treating it as a loading failure.
Expected result: You know your current account context, the settings your role can reach, and how to review what Atlas remembers about you.


Organisation identity and deletion
Screen: /settings/organisation
Use case: Maintain the organisation’s identity deliberately.
Before you begin: Use an account with access to this feature in the correct organisation.
How to do it
- Open Organisation, reached from ORGANISATION in the Settings sidebar. Edit Company name — the name every colleague sees for your company inside Atlas — and Save.
- Tick Main organisation to mark this as the main one among the organisations you belong to (for example, for testing); it has no effect beyond that marker.
- Membership and platform access are separate contexts; do not infer member rights from an operator view.
- Read Delete organisation's warning before choosing it: every colleague is signed out at once, nobody can sign in to that organisation again, and its records are kept locked and restorable only by Atlas support. This walk read that warning without opening the confirmation.
Expected result: The organisation identity is correct and destructive changes are deliberate.
No organisation was created, renamed or deleted during the study.

Customer recycling rules are under Settings → Customer management → Public customer rules, not organisation identity. See customer pool recycling for permissions, preview and timing.
Invite and manage members
Screen: /settings/organisation
Use case: Give a colleague the intended level of access.
Before you begin: Use an account with access to this feature in the correct organisation.
How to do it
- In Members, read the seat summary ("N of M seats free · N active · N pending") and Pending invitations before choosing Invite colleague.
- Each row in the member table (Name, Email, Role, Status, First seen, Last seen) carries a set of role checkboxes rather than one picklist — Admin, Manager, Rep and Integration Sender, plus any organisation-specific role such as this organisation's Integrations connector; Owner is a separate checkbox held by the account holder. Tick or clear the roles a colleague should hold, then Deactivate a member who should lose access entirely.
- Role changes and deactivations take effect at the person's next sign-in; a session already open stays signed in until it expires — deactivating is not the same as ending a live session.
- Check Membership activity below the table for every Invited, Joined, Role changed and Deactivated event, with who made the change, who it affected, and its outcome.
Expected result: The intended colleague receives only the intended access, and the change is visible in Membership activity.
Invitation form inspected without sending. Role changes and deactivation are not a substitute for explicitly ending an existing session.
Roles and effective permissions
Screen: /settings/organisation
Use case: Control what each role can view or edit.
Before you begin: Use an account with access to this feature in the correct organisation.
How to do it
- Open Roles & permissions, below Members on the same page. Each row is one resource (Organisation, Members, Roles & permissions, Billing, Subscription, Model provider, Pilot usage, Agent quality, Knowledge, Knowledge files, Customer labels, Sales & CRM settings, Pipeline & activity standards, AI configuration, Integrations) with a None/Read/Write column per role.
- Owner and Admin are fixed at Write for every resource except Subscription, where both are fixed at Read; only Manager, Rep and any custom role (such as this organisation's Integrations connector) can be changed.
- Choose Add role when a custom role is needed. Give it a name (up to 40 characters) and select the base role, then save.
- Adjust only the intended resource permissions and Save. Changes take effect the next time the affected person signs in.
- Rename a custom role when necessary. Delete only an unused role; reassign affected members first if the interface requires it.
Expected result: Access is defined by the effective permission matrix, not a role name alone.
The Pipeline & activity standards row covers editing pipeline stages (including re-seeding the default stage catalogue) and publishing the company activity standard (including its run-now sweep). Managers hold it by default; setting it to None withholds stage editing from managers too, and the Sales & CRM page reflects the revocation immediately after their next sign-in.
Permission controls were inspected; no access policy or membership was changed.
Sessions and authentication policy
Screen: /settings/security
Use case: Review signed-in devices and end unwanted access.
Before you begin: Use an account with access to this feature in the correct organisation.
How to do it
- Open Security, reached from ORGANISATION in the Settings sidebar for every role, then Your sessions. Compare browser, location and activity times with your own usage.
- Use End this session for an unfamiliar or obsolete session. That browser is signed out on its next action.
- Use Sign out on all devices only when you intend to end all sessions, including your own; be ready to sign in again.
- Administrators can inspect authentication policy and activity where shown. Read the policy effect before saving any change.
Expected result: Unwanted sessions can be revoked without confusing them with ordinary role edits.
No sessions were revoked and no authentication setting was changed. This page was not captured in the 2026-09-22 staging walk; the steps above describe the last-verified behaviour.
Pilot readiness and communication channels
Screen: /settings/integrations
Use case: Check the pilot-readiness evidence for this organisation and manage the channels behind it.
Before you begin: Use an account with access to this feature in the correct organisation. A rep also has Integrations in their reduced Settings menu; this walk captured the page from an admin account.
How to do it
- Open Integrations, reached from ORGANISATION in the Settings sidebar. Admins and owners see Pilot readiness first: four cards — People, Knowledge, Email and Preparation — each scoped separately, each with its own Ready, Failed or Unverified state, a plain-language evidence line, and a Checked at timestamp. A row here is limited to its named check; it never means the pilot itself has been accepted.
- Read each card's own evidence before trusting a Ready label: People reports the visible active-member count; Knowledge reports caller-answerable sources; Email is Failed as soon as any visible account is paused, disconnected, incomplete, missing a capability, or has an explicit check or sync failure, and lists every such account with its state and an Open link into it; Preparation reports whether an active Sales Assistant and at least one active schedule are configured.
- Choose Refresh evidence to re-check. A refresh keeps a row's own already-successful, independently checked evidence; changing session or organisation clears stale preparation evidence.
- Below Pilot readiness, use Preparation controls to manage the pilot's actual channels: Email channels lists Custom email — the organisation's own inbox — with a Connect account flow of three steps (Account, Settings, Verify) covering shared or personal mailboxes, incoming/outgoing server and port, and an app password (never the mailbox owner's sign-in password; Atlas seals it and shows only a masked hint afterwards). Operator tools lists MCP server and Self-test (email), kept separate from pilot email readiness. Future connectors lists WeCom and WhatsApp, both Coming soon and not yet connectable.
- Open a connected account from the list for its Overview, Access and Activity: run its check again, pause or resume it, choose Repair email settings after a password changes, or disconnect it. Disconnect is final and cannot be undone.
Expected result: Pilot readiness is read from four separately scoped, honestly labelled cards rather than one pass/fail score, and every communication account shows its own connect, repair or disconnect path. Rows can be mixed — connected, configured or checked never by itself proves message receipt, delivery, company-wide coverage or pilot acceptance.
Email is the channel open for connecting today; WeCom and WhatsApp are announced but not yet connectable. No credential is ever returned by any screen here.


Connect your email to Atlas
Get your work email into Atlas Inbox. Takes about 5 minutes; Atlas fills in every mail setting for you.
Before you begin: the only thing you make yourself is an app password. It is a special password your email provider creates for apps like Atlas. Only you can create it, because it is tied to your own email login and phone; your IT admin cannot make it for you. Everything else is filled in automatically.
In Atlas: start
- Click Superpower, then Plugins, then Email. Click Other email (IMAP/SMTP).
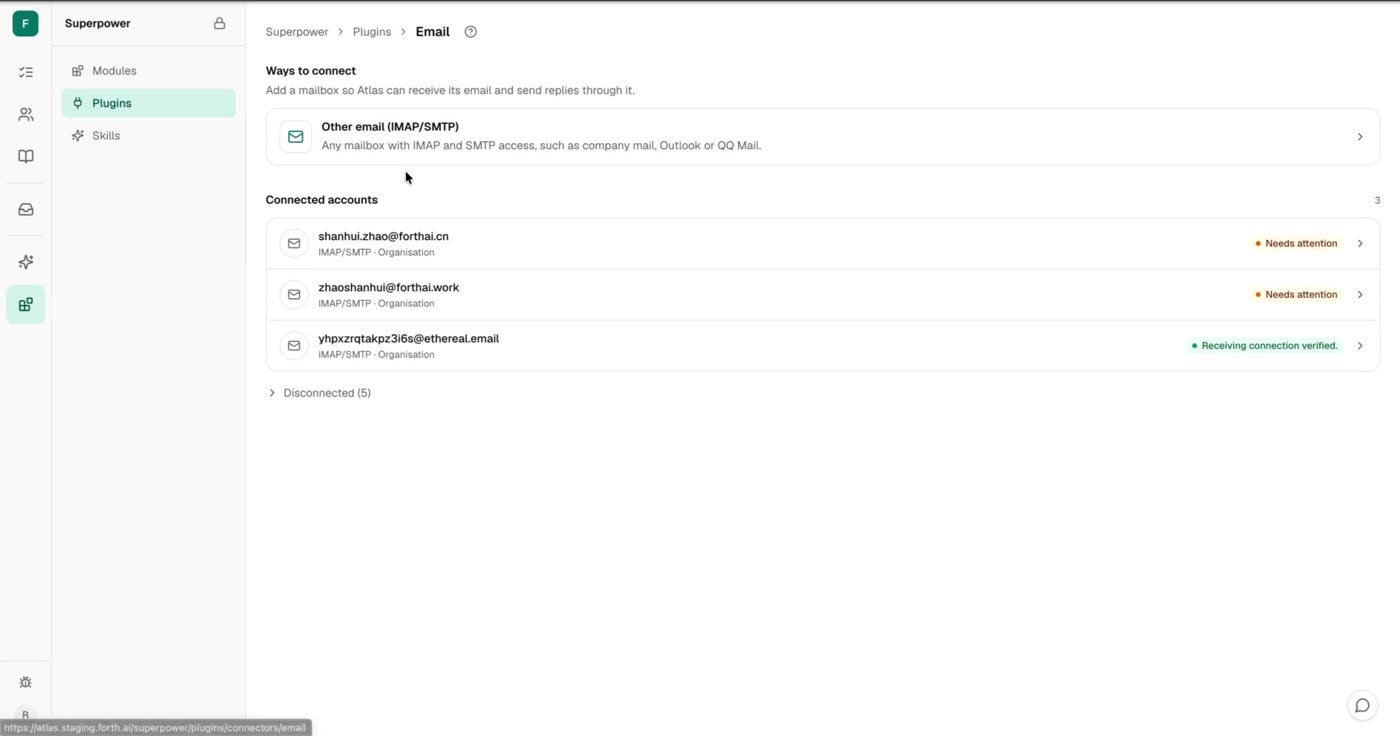
Click Other email (IMAP/SMTP). - Choose Personal account for a mailbox only you can use, then click Continue. Shared account setup requires administrator permission.
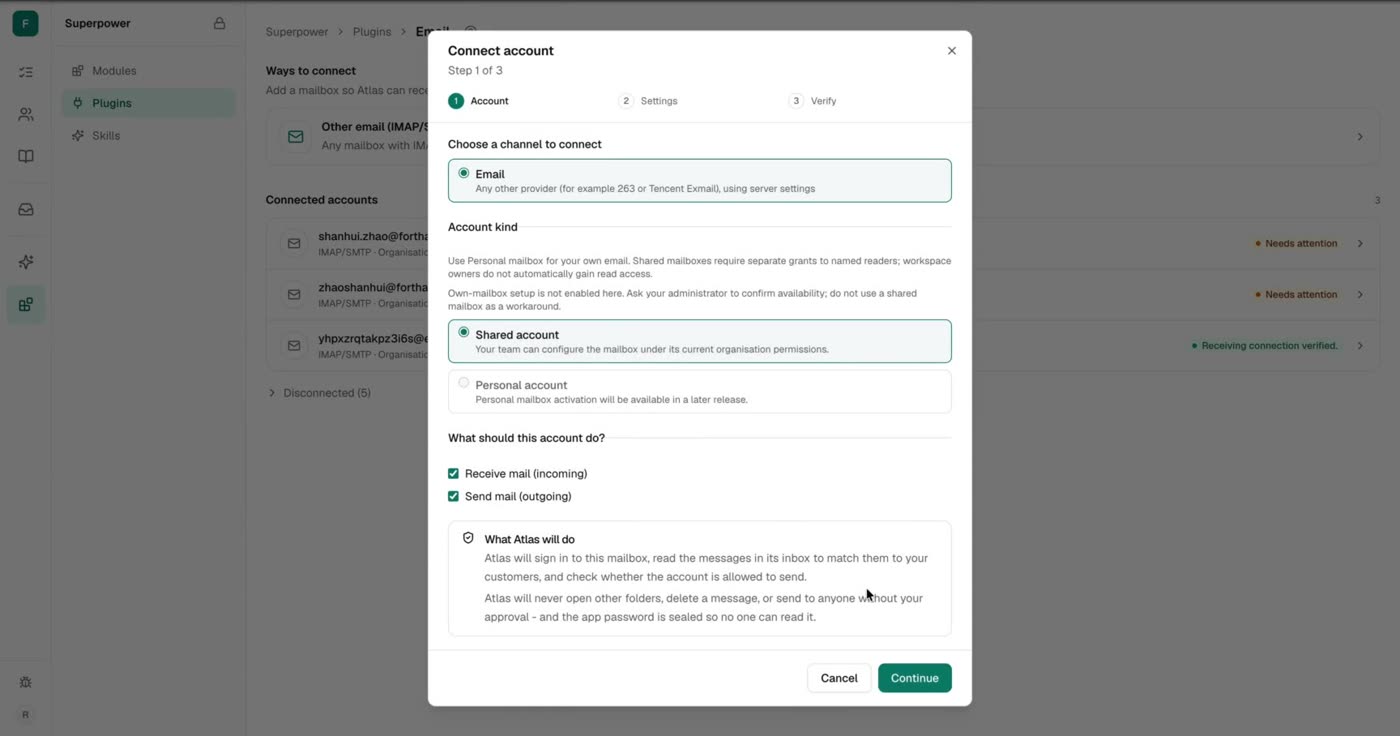
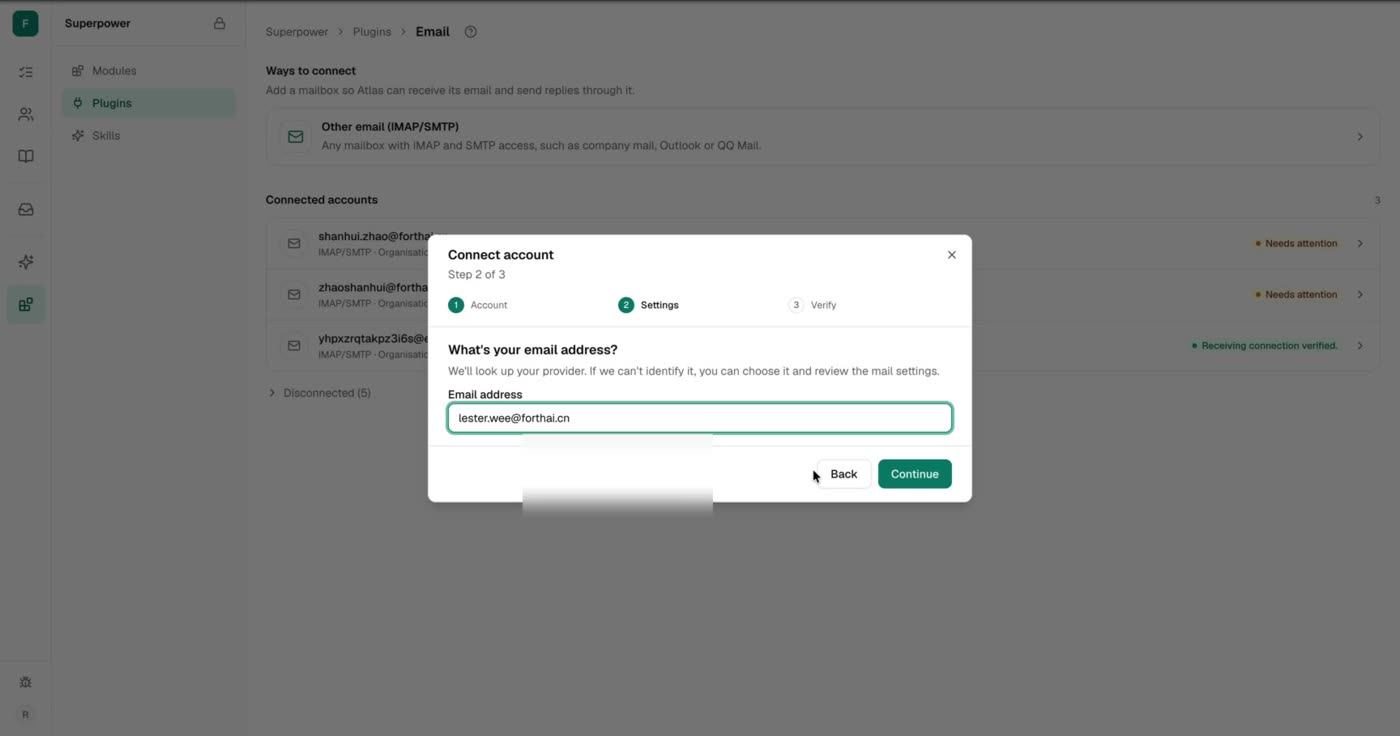
Click Continue. - Type your work email address. Click Continue.
Type your email address. - Atlas shows Found your provider and fills in every box except the app password. Point at the (i) next to Incoming app password, then click the link at the bottom of the card. Your email settings open in a new tab.
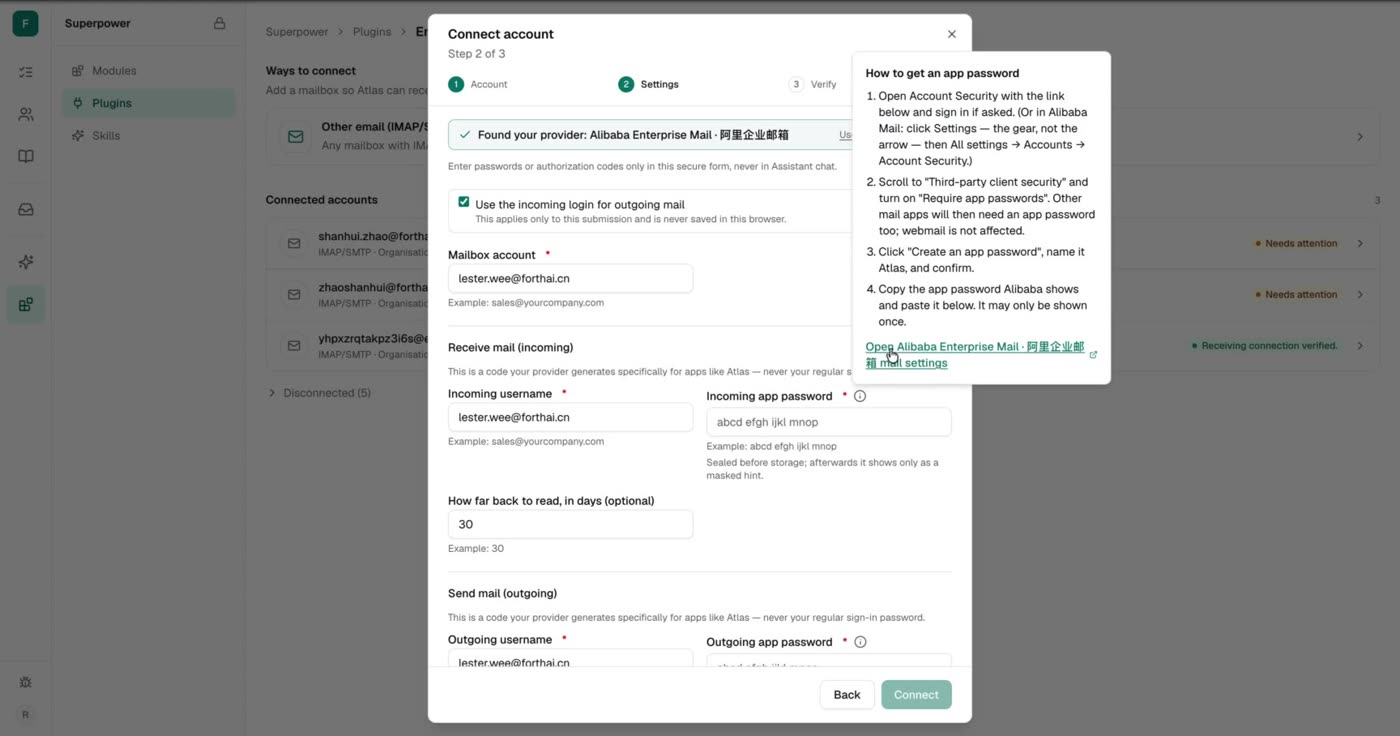
Point at (i), then click the link.
In your email: create the app password
This example is Alibaba Mail (阿里企业邮箱). Other providers look similar; the (i) card shows their steps.
- Find Third-party client security. Make sure Require app passwords is on. Click Create an app password.
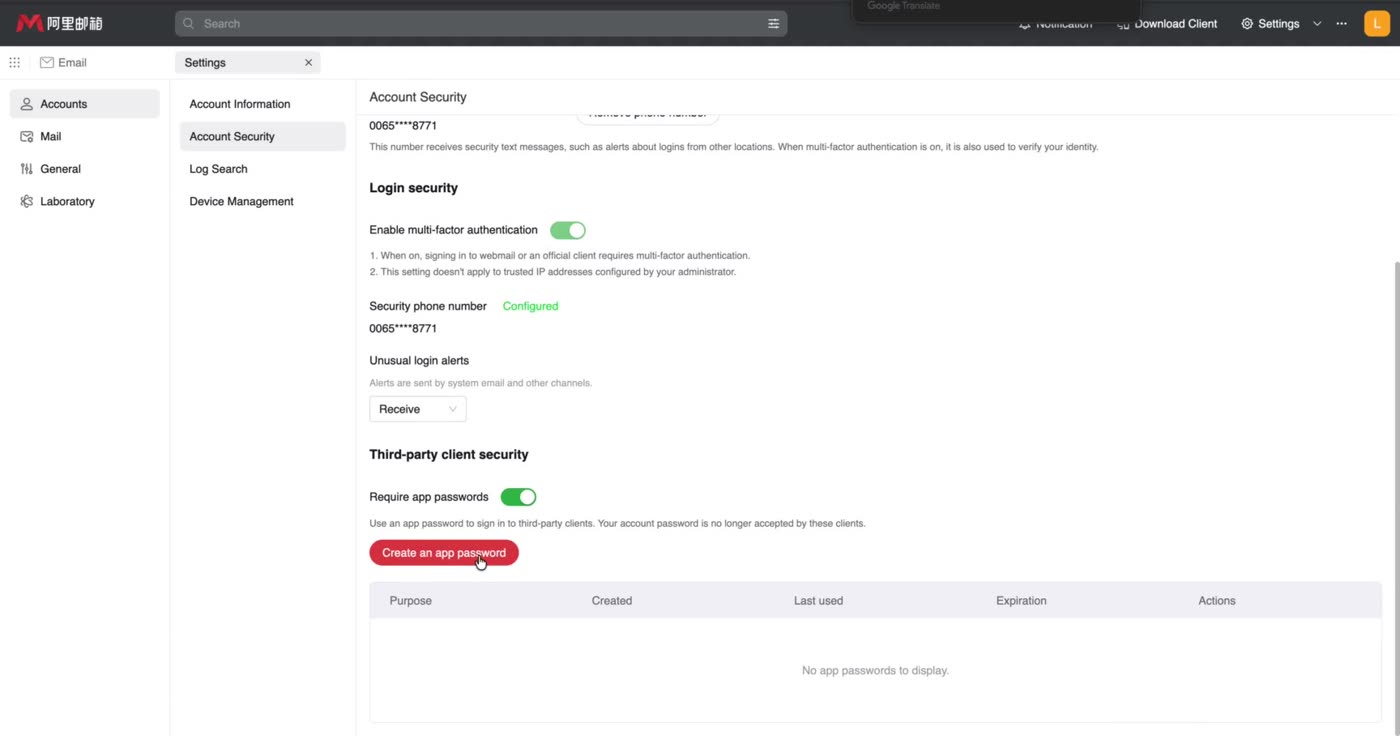
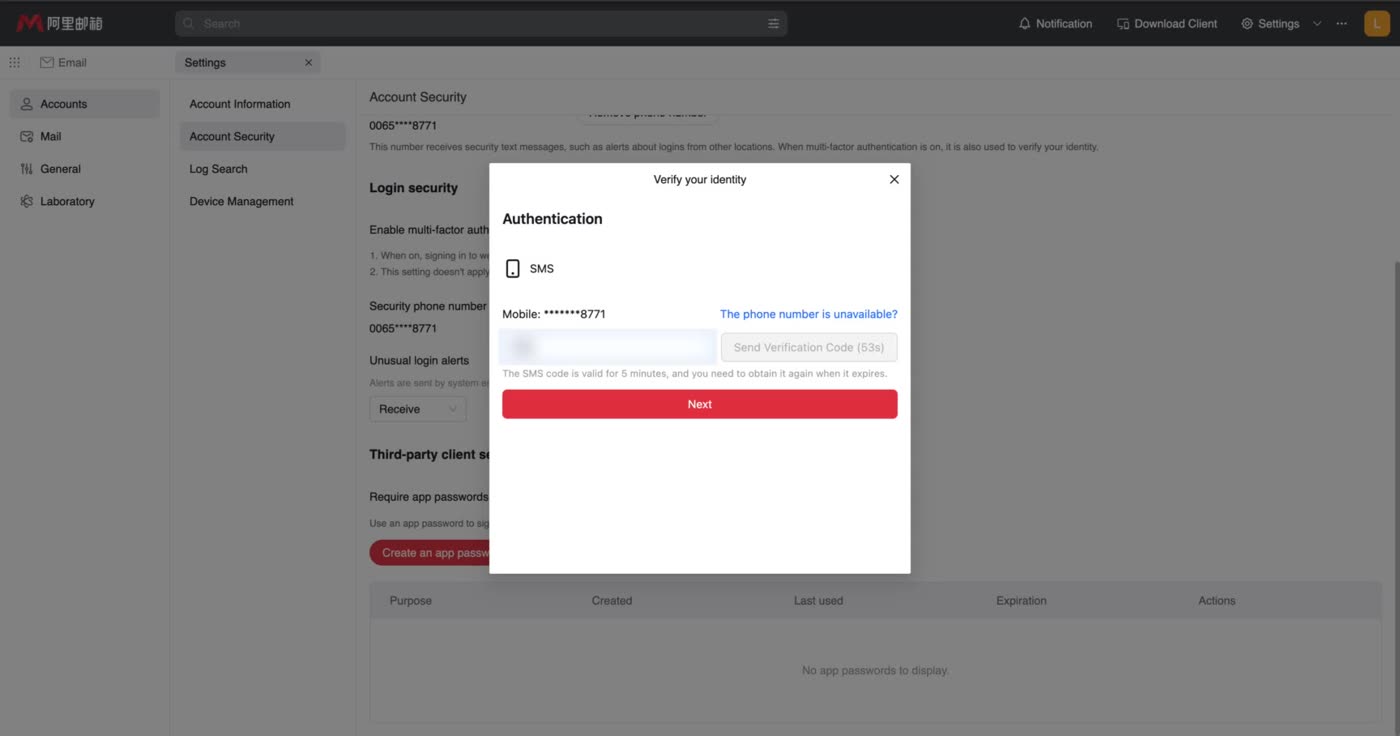
Click Create an app password. - Click Send Verification Code. Type the code sent to your phone. Click Next.
Type the SMS code, then click Next. - Your app password appears. Click Copy. Type Atlas as the name. Click Confirm. It is shown only once, so copy it first.
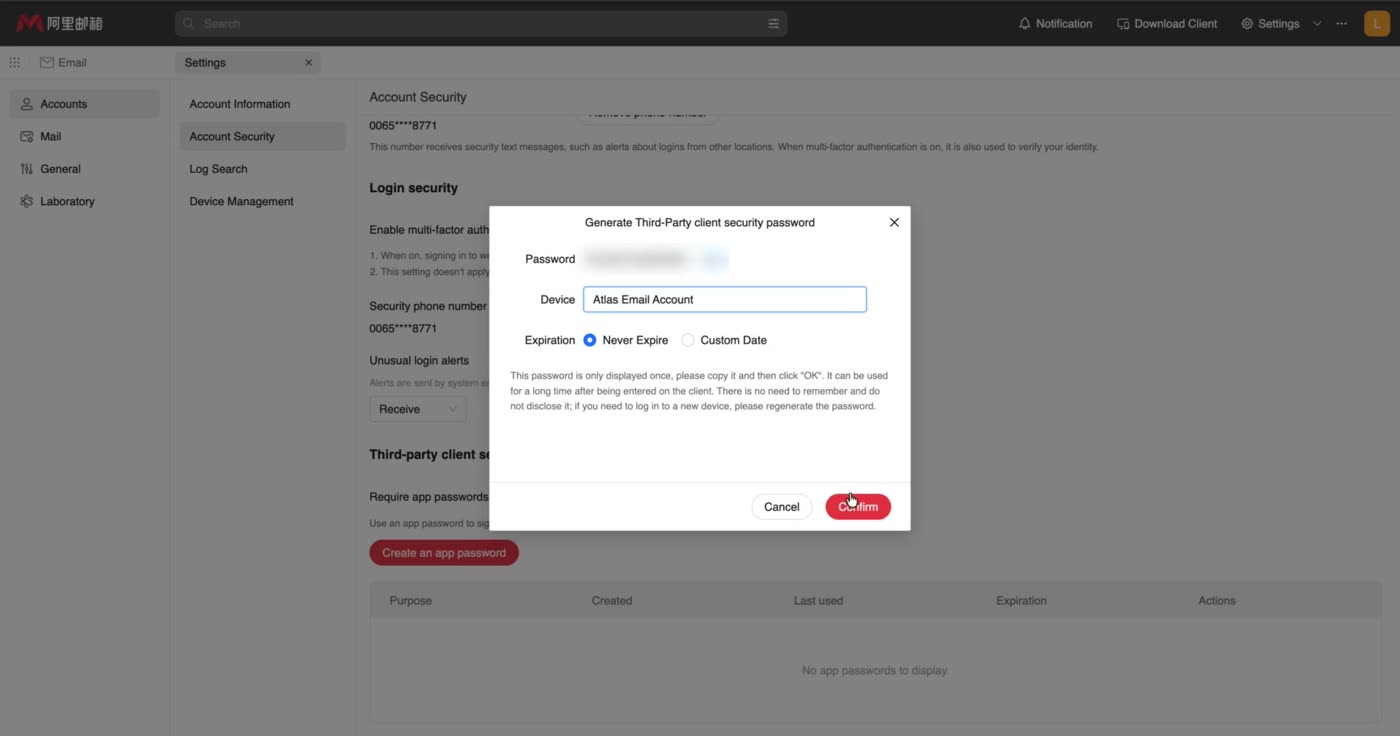
Click Copy, name it Atlas, click Confirm.
Back in Atlas: connect
- Paste the app password into Incoming app password. The outgoing one fills itself in.
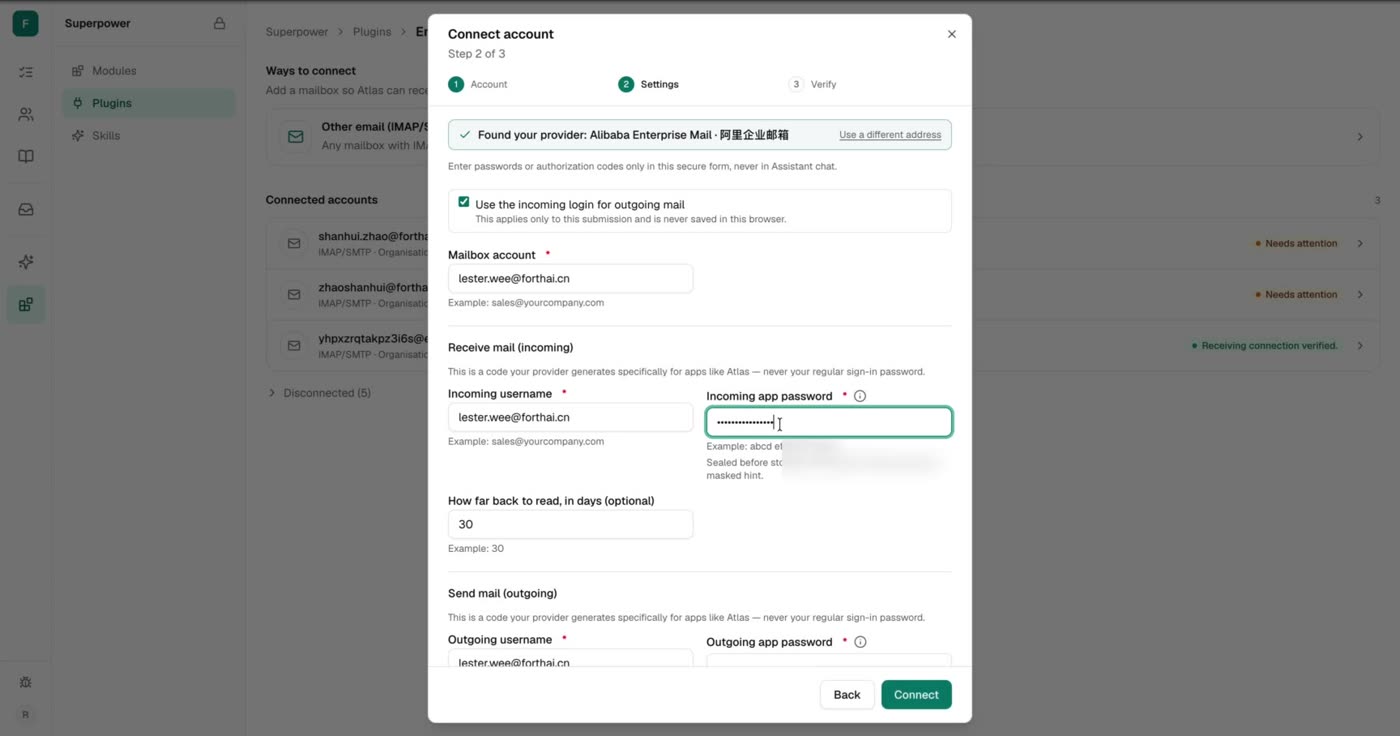
Paste it here. - Click Connect.
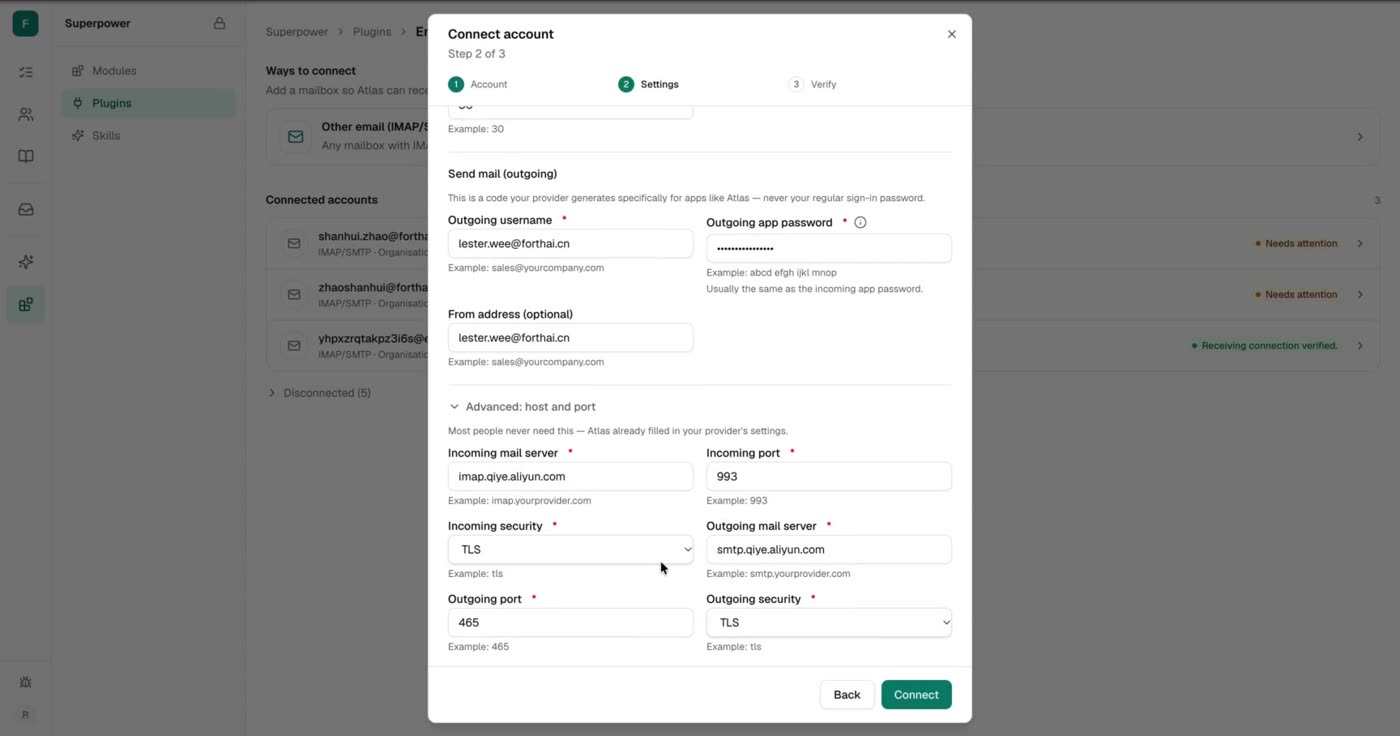
Click Connect. - Wait for the check to finish. Click Done. Your mailbox now shows under Connected accounts.
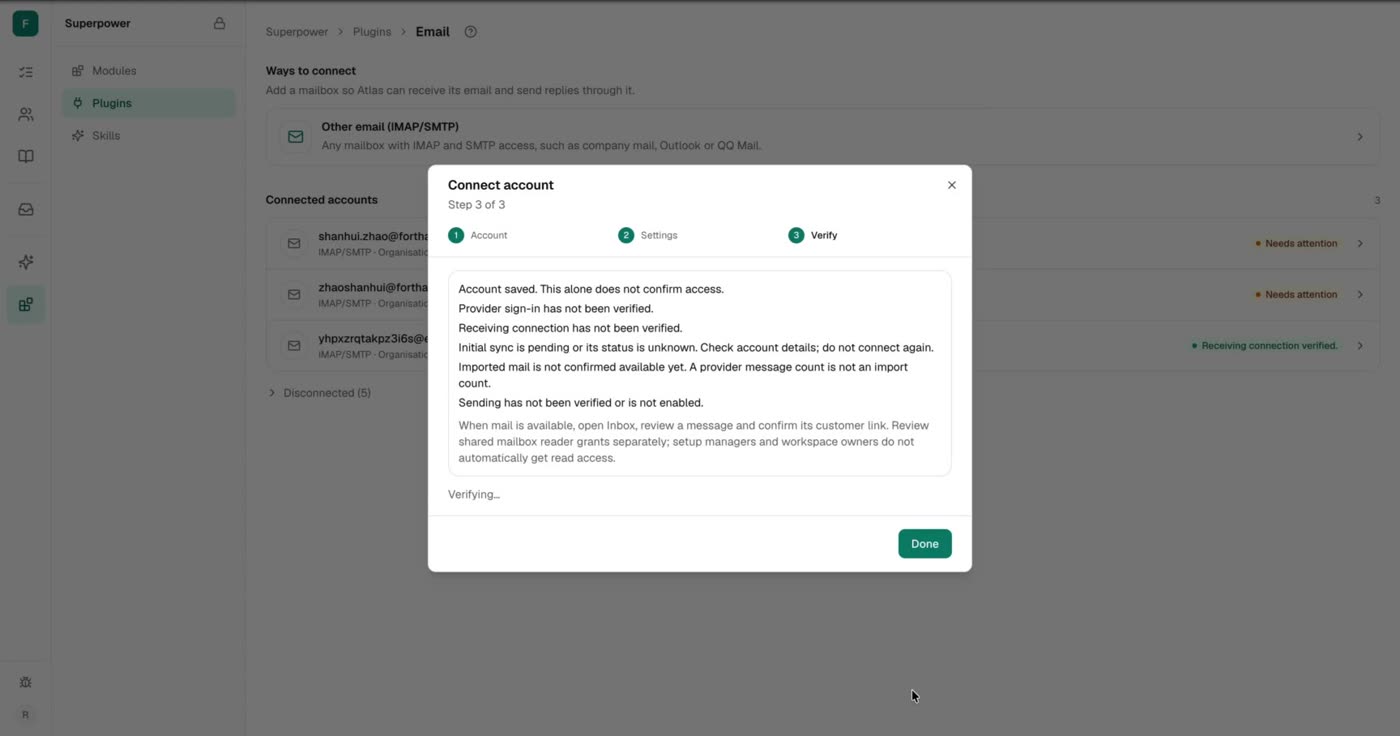
Click Done. 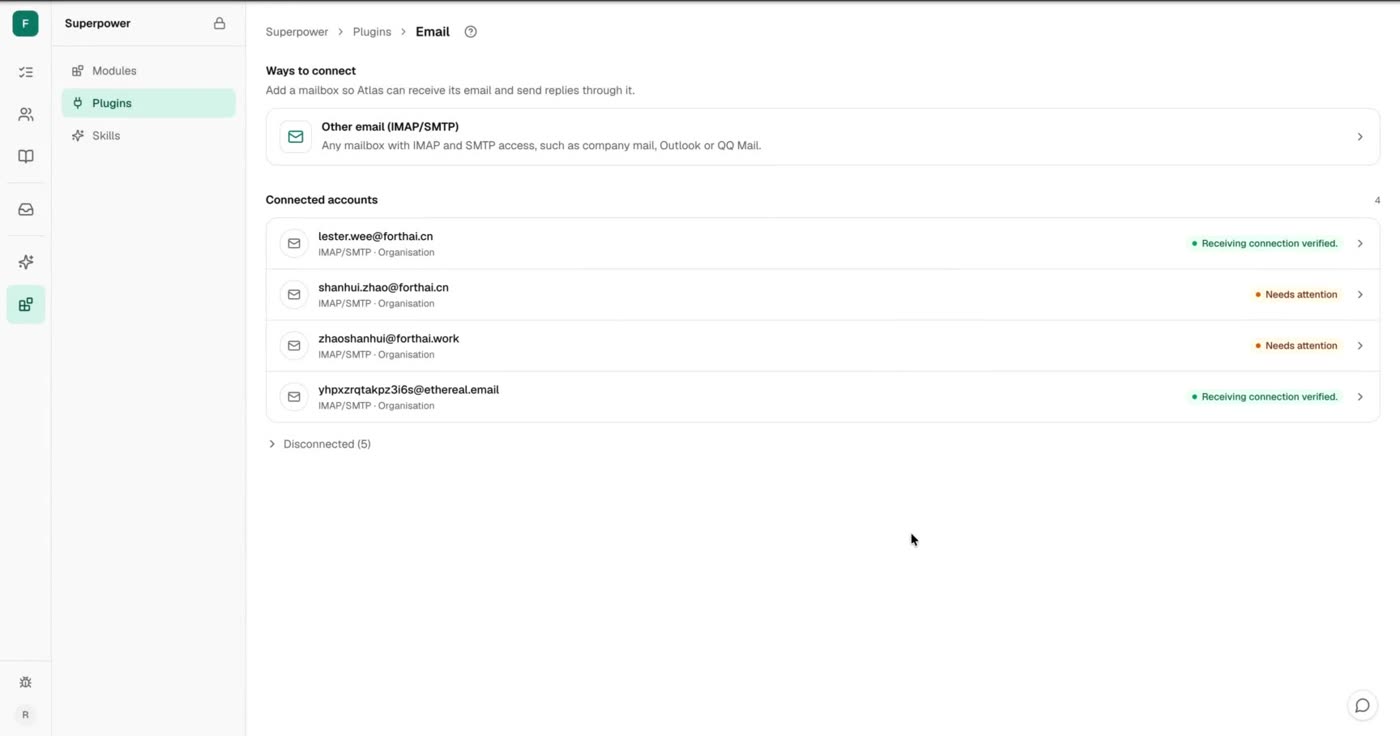
Your mailbox is connected.
See your mail
Your first emails take up to 5 minutes to show up. After that, Atlas checks for new mail every 5 minutes.
- Open Inbox. At the top left, pick your mailbox.
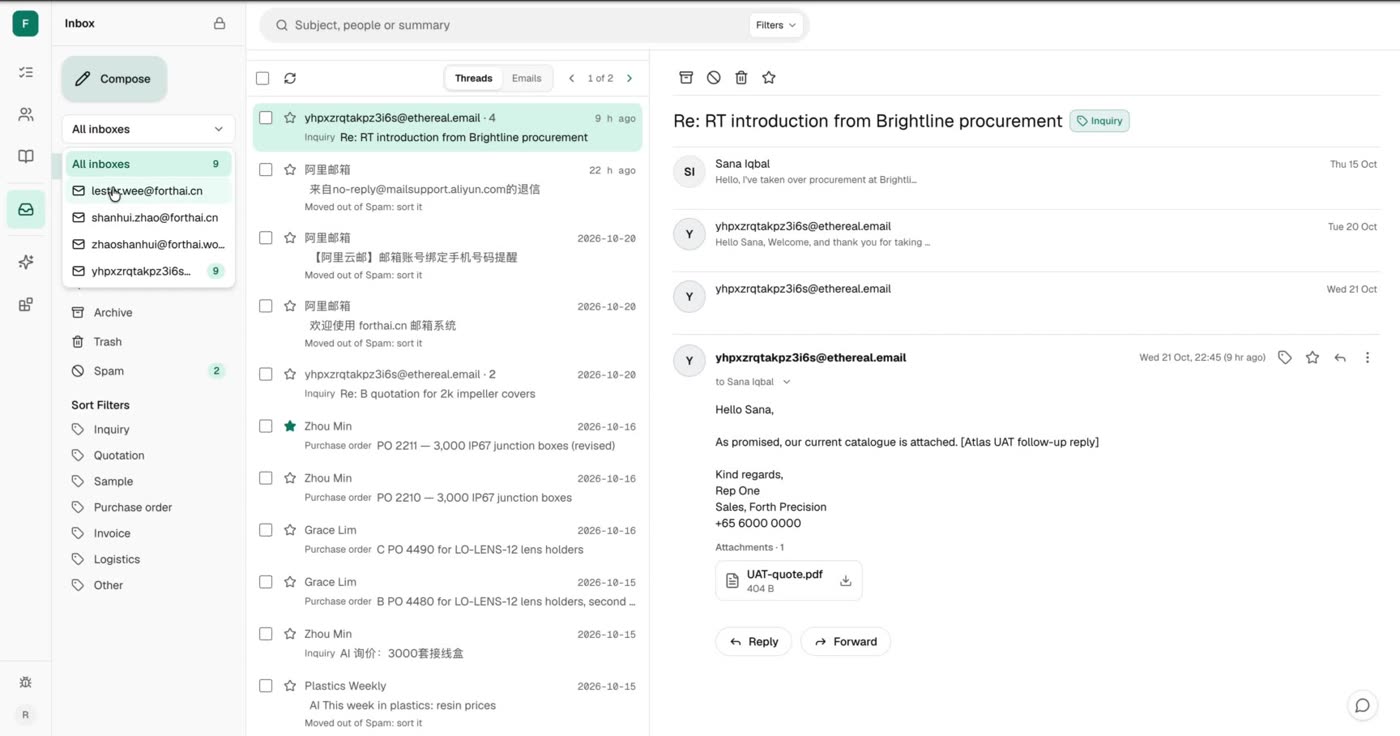
Pick your mailbox. - Inbox empty? Click Spam. A number next to Spam means your mail arrived; Atlas puts automatic emails (system notices, no-reply senders) there. Open one and click Not spam to move it to Inbox.
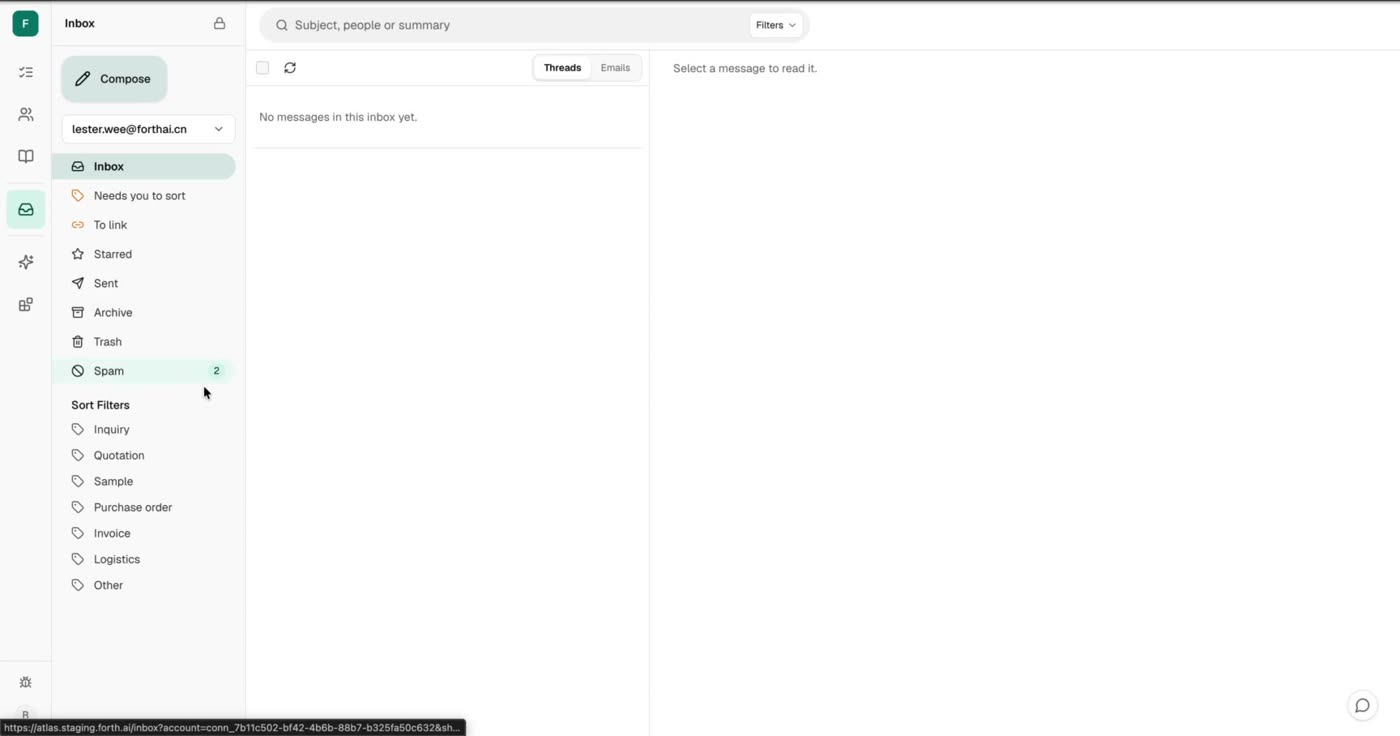
Empty Inbox, but Spam has a count. 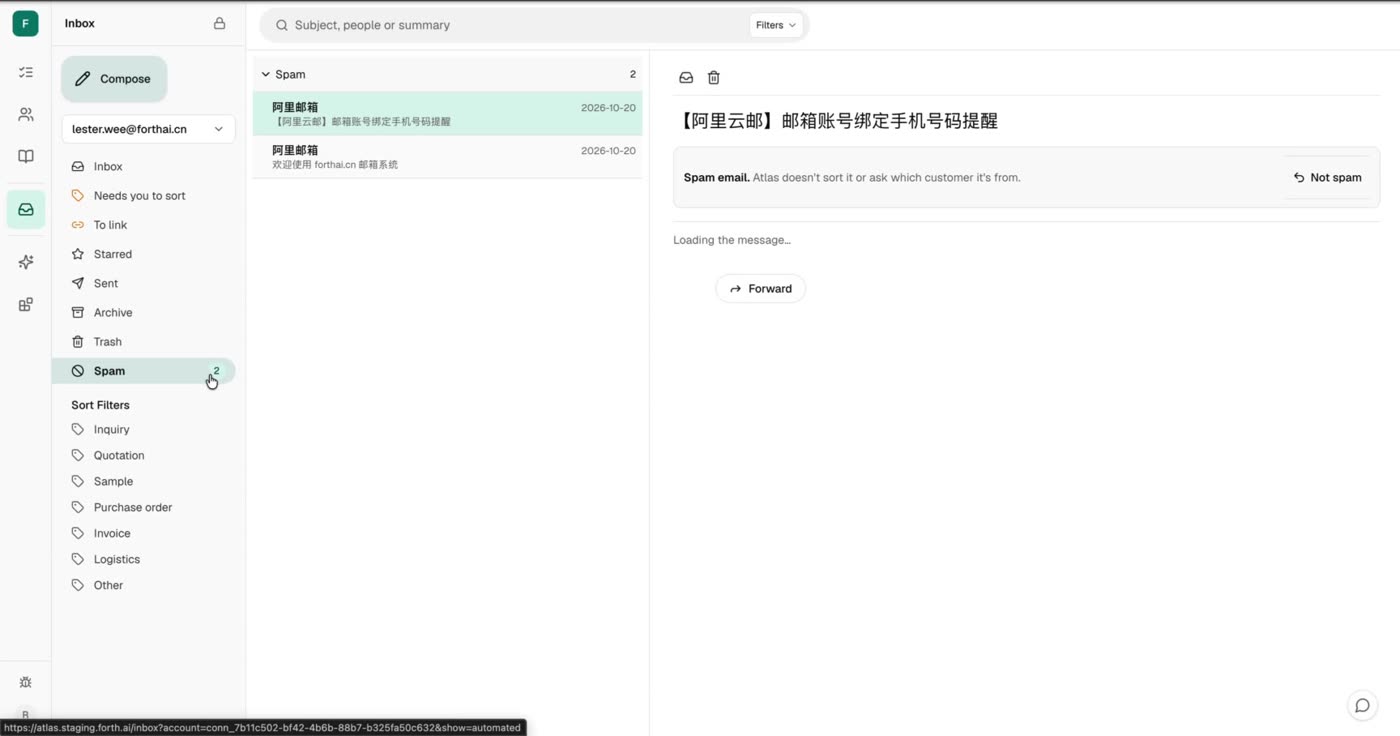
The mail is in Spam. Click Not spam to move it.
Done when: your mailbox is under Connected accounts, and its mail shows in Inbox or Spam within 5 minutes. Connecting sends nothing.
Other providers and Gmail
The (i) card gives steps for the provider Atlas recognised. For 263, sign in to your 263 webmail, open Settings and find the client or IMAP/SMTP settings. If your administrator permits it, enable client access and generate a client authorization code; see the official 263 instructions. If there is no code option, ask your mailbox administrator. Paste codes only into the secure form, never into Assistant chat or to support. When app passwords or authorization codes are enabled, your ordinary sign-in password does not work for clients.
If Atlas cannot identify the provider, use Email provider to choose iCloud Mail, Yahoo Mail, QQ Mail, Tencent Enterprise Email or NetEase Enterprise Mail, then Use this provider. These are starting settings: confirm the actual provider for your address. For another host, choose Other provider · enter settings manually and enter your provider's IMAP/SMTP hosts, ports and encryption modes under Advanced. If you need help, choose Ask us to set it up; the support email includes the domain, so send non-secret details only. Microsoft password setup is unavailable here; this wizard does not add Microsoft OAuth. See Microsoft's authentication requirements.
For Google mail, choose Connect beside Gmail when it is offered and follow the Google consent screens. The Google flow is available only when your workspace offers it. Personal Gmail connects only your own mailbox. Sign in and approve access on Google; never enter your Google password into Atlas. See Google's app-access guidance for administrators.
If you get stuck
- Save result unknown: choose Check saved account. A reload retains the pending attempt without its secrets. Do not create another account or sync job while the result is unknown. Wait and check again, or ask support to investigate.
- Credential rejected: check the app password or client authorization code and use Correct the values in the secure form.
- Client access disabled: use Copy message and ask your mailbox administrator to review client access. Repeated code changes cannot remove that restriction.
- Disconnected account: it is different from no account. Review the account's explanation; a disconnected account cannot be reconnected in place, so add it again only when you intend to restore access. For an existing Gmail account that needs authorisation, use Reconnect with Google when offered.
- Accounts failed to load: retry the read. Do not assume that no accounts exist or start another connection from an error message.
For guided help, say Help me connect my email. Assistant offers the secure wizard one step at a time. Keep addresses and credentials in the form, not in chat.
Your personal mailbox can use a different domain from your Atlas sign-in address or organisation. It stays private to you. For an eligible saved mailbox, use Sync now to retry, or wait for the next scheduled run, normally within five minutes. Slow imports now allow up to two minutes per mail-server session. The first background kickoff is shorter; later runs continue from saved progress. A connection rejected before saving must be corrected and submitted again.
Import older mail
Open the saved Email account’s details. Under Mail history, choose Import all history to include every date available in its Inbox, without re-entering your password. The action is available to an active member who can manage and read that account after receiving is verified. Existing mail and its review state are kept. Older messages arrive in batches; the open Inbox refreshes while visible. All history enabled confirms the saved choice, not that every message has arrived. Sync now runs another bounded batch. In new Email setup, the history field also offers All available history; other accounts keep their saved choice and new accounts still default to 30 days. This applies to the IMAP Inbox, not other folders or Gmail. The seven-day provider-check count is not your import window.
For 263, also check the provider’s Settings → Folder management → client mail collection time and choose All if you want older Inbox mail exposed to Atlas. Its automatic archiving can move older mail out of Inbox; those messages remain in Archive and are outside this connector’s current Inbox-only scope. See the 263 user manual, Folder management. Atlas cannot override a provider-side date limit.
Check access, sync and sending separately
On the saved account, check the account kind, who can read a shared account, and the enabled Receive and Send directions. A person who can configure a shared mailbox is not automatically a reader; ask its administrator to grant named readers. Review the receiving and sending checks separately. A saved account, a passing provider check, a sync in progress and imported messages are different milestones. If receiving is paused or skipped, read the displayed cause before changing credentials. A sending check does not prove that an external recipient received an email. An empty Inbox does not by itself mean no account exists.
In Inbox, the lock marks a private mailbox and the people icon marks a shared mailbox. The pencil beside the Inbox heading opens Compose. On a phone, the mailbox selector also names the account kind. An unknown account kind keeps its provider icon.
Model provider policy and credentials
Screen: /settings/model-keys
Use case: Choose who supplies models and pays for their use.
Before you begin: Use an account with access to this feature in the correct organisation.
How to do it
- Open Model provider, reached from AI & AGENTS in the Settings sidebar (admin and owner only), and read Current policy. Select Atlas managed to use platform credentials, or Self managed to use organisation-owned provider keys.
- For Atlas managed, choose Optimised route, DeepSeek only or GLM only from the offered routes. Save the intended policy.
- For Self managed, add/store a valid provider key, inspect its masked status and test it where offered. Never place a raw key in screenshots, notes or chat.
- Choose a primary model backed by an active organisation key. If fallback is enabled, order the additional self-managed routes; they do not borrow Atlas credentials.
- Save configuration and verify Current policy. Replace or revoke credentials deliberately and inspect audit/status; unsaved radio changes are only a draft.
Expected result: Model access and billing responsibility match the saved policy.
Managed and self-managed forms were inspected; the draft choice was restored without saving. No key was entered, revealed or tested. This page was not captured in the 2026-09-22 staging walk; the steps above describe the last-verified behaviour.

Scheduled briefings and prepared work
Screen: /settings/ai
Use case: Choose which background assistance your organisation uses.
Before you begin: Use an account with access to this feature in the correct organisation. A rep has AI configuration too, in their reduced AI & AGENTS section.
How to do it
- Open AI configuration, reached from AI & AGENTS in the Settings sidebar, and read the two toggles. Scheduled briefings is a pop-up recap three times a day summarising changes, priorities and prepared work. Autonomous prepared work is the overnight sweep that drafts replies and follow-ups for open priorities.
- Every toggle defaults to on until it is changed here.
- If you have write permission, change the intended switch and Save. Otherwise use the page as read-only information.
- Reopen the page to verify the saved configuration. Prepared content still needs the applicable human review and send decision.
Expected result: The organisation’s automation preferences are explicit.
Both switches were inspected without changes. Enabling preparation does not itself authorise every outbound message.

Usage, wallet and billing history
Screen: /settings/billing
Use case: Understand recorded model use and wallet movements.
Before you begin: Use an account with access to this feature in the correct organisation, reached from BILLING & USAGE in the Settings sidebar (not shown to a rep).
How to do it
- Open Billing, set the From/To dates and Apply. Read Successful calls (ok / total in range) and Tokens together — costs appear only once a price is set for each model, so a call can show as successful with no cost yet.
- Inspect Wallet balances ("No wallets yet" until a top-up is recorded), Employee wallet consent (charges never touch a member's personal wallet until they record consent, and they can withdraw it at any time), and the 5-hour and 7-day AI usage windows for the organisation and, below that, per member.
- Inspect Usage by person, workflow and model: person, workflow, model, cost owner, calls, tokens in/out and cost; a workflow not yet priced shows "Not rated yet" instead of a cost.
- Choose Meaningful usage scorecard → to open Pilot usage for the same organisation and period.
- If Record a manual top-up is permitted, select the wallet, enter the token amount and a real reason, then Record only an authorised adjustment. Check the resulting row in the append-only Transaction ledger.
Expected result: Usage, wallet balances and the transaction ledger can be reconciled within the selected period. Recording a top-up or usage value is not a bank transfer or proof of payment.
Controls were inspected; no billing adjustment, financial record or payment was created. AI agent hires appear in usage rows by their hire_… identifier alongside human members.

Subscription and seats
Screen: /settings/subscription
Use case: Read the organisation’s recorded commercial terms.
Before you begin: Use an account with access to this feature in the correct organisation, reached from BILLING & USAGE in the Settings sidebar (not shown to a rep).
How to do it
- Open Subscription and read its own line: "Your organisation's commercial state with Atlas. Read-only — terms are maintained by the Atlas operator."
- If no subscription is configured, the page says so explicitly — "No subscription record is configured for this organisation yet" — and adds that nothing shown is estimated; do not infer a free plan or unlimited access from an empty state.
- For a correction or renewal, contact the Atlas operator who maintains the terms. Compare available seats with Organisation → Members before inviting colleagues.
Expected result: Commercial terms are read from recorded data rather than estimates.
This page is read-only.
Plans, pricing and usage limits
What an Atlas account costs, and exactly how usage is counted.
Use case: Understand your account's price, its two rolling usage windows, and how every model call is counted in credits before you need them.
Before you begin: Open Settings → Billing to see your organisation's ledger. Reading your own usage needs no special permission.
How to do it
- Find your tier in the pricing table — every user account pays one flat yearly price, and a heavier month never changes the bill, it only uses more of the windows.
- Read how a credit is counted: one credit represents a fixed amount of underlying model cost at the provider's standard rate, so metering is identical whichever model answers, at any hour. Cached input is detected and charged automatically at the cached rate.
- Watch your windows on Settings → Billing: the 5-hour window refills continuously as usage ages out, and the 7-day window covers the week. A typical assistant turn costs about 20 credits; a heavy day of around a hundred turns about 2,000.
- When a window is exhausted, new model calls pause until usage drains out; the refusal and the Billing page name which window and when it frees up. Customers, records, knowledge, tasks and imports are never blocked by usage limits, and an organisation-level monthly cap set by your administrator acts as a backstop with an 80% warning.
| Tier | Price | 5-hour rolling window | 7-day rolling window |
|---|---|---|---|
| Team | ¥2,000 per account per year | 5,000 credits | 20,000 credits |
| Model route | Input (per 1M tokens) | Cached input | Output |
|---|---|---|---|
| DeepSeek | 2,200 credits | 50 credits | 8,700 credits |
| GLM-5.3-flash | 1,100 credits | 25 credits | 3,600 credits |
Expected result: Pricing is predictable (one flat price), usage is transparent (every call appears on the billing ledger in credits), and limits are stable because they are measured at the providers' standard rates regardless of the time of day. Further tiers may be introduced later and will be documented here.
Limits belong to your account and follow you across your organisations; the organisation cap is separate and reported independently.
Pilot adoption, work and targets
Screen: /settings/pilot-usage
Use case: Separate product use from business outcomes.
Before you begin: Use an account with access to this feature in the correct organisation. This page no longer has its own entry in the Settings sidebar; reach it from Settings → Billing via Meaningful usage scorecard →.
How to do it
- Select date range and timezone, then Apply. Review usage frequency and meaningful work separately.
- Inspect weekly trends and per-user rows; check definitions before comparing active seats, working days and effective actions.
- Read outreach outcomes by trigger. Prepared drafts, actual sends and recorded replies are different events; the displayed reply window is fourteen days after sending.
- If permitted, set pilot targets and Save targets. Targets do not alter measured actuals; use the model-usage link for token/cost analysis.
Expected result: Pilot performance is interpreted using explicit definitions and periods.
This page needs a platform-operator account and was not re-observed on 2026-09-22; the steps above describe the administered behaviour.
Agent quality metrics and alerts
Screen: /settings/agent-quality
Use case: Inspect quality evidence without assuming causation.
Before you begin: Use an account with access to this feature in the correct organisation.
How to do it
- Open Agent quality, reached from AI & AGENTS in the Settings sidebar (admin and owner only). Select dates and timezone, then Apply. Read each metric’s definition, numerator/denominator and availability label.
- Inspect recommendation lifecycle, acceptance-to-completion, edits, time-to-action, regeneration, abandonment, citations, dissatisfaction and recorded work/customer changes.
- Use evidence references to inspect supporting records. Waiting for data, insufficient data and not instrumented are different states; none should be reported as zero.
- Open Alerts, inspect the metric/window and evidence behind a warning, and follow its available review controls. Avoid treating these metrics as one overall score or proof that AI caused sales.
Expected result: Quality claims are tied to evidence and measurement limits.
This page was not captured in the 2026-09-22 staging walk; the steps above describe the last-verified behaviour.
Agent logs: traces, evaluations and human review
Screen: /settings/traces
Use case: Understand what happened in an assistant run.
Before you begin: Use an account with access to this feature in the correct organisation.
How to do it
- Open Agent logs, reached from KNOWLEDGE in the Settings sidebar — its last entry, admin and manager only — and filter All, Live, Evaluation, Evaluated or Needs review. Choose the relevant run.
- Inspect summary, model, tokens, cost, latency, versions, scope, spans, actions and events. Follow related runs to understand the chain.
- Read automatic evaluation verdicts, routing reasons and report/trial/version identity. The panel is read-only; it does not start an evaluation campaign.
- Where human review is permitted, choose Pass, Fail or Needs more evidence, add a reason (up to 500 characters) and Record decision. Reload review state if stale.
- Keep human decisions separate from automatic results and inspect their histories.
- An AI-team item also appears on Workbench under Needs your decision → AI TEAM. Choose View agent to open the hired agent, or Review work to jump straight into that item's run here.
Expected result: A run’s actions and evaluations can be inspected without conflating different evidence.
Entry uses admin/manager access. List/filter controls were observed; review decisions were not submitted. This page's own detail was not captured in the 2026-09-22 staging walk; the Workbench cross-link above was.
Managed knowledge sources in Settings
Screen: /settings/knowledge redirects to /knowledge?scope=company&panel=sources
Use case: Upload typed reference material for assistant retrieval.
Before you begin: Use an account with access to this feature in the correct organisation.
How to do it
- Settings no longer has its own Knowledge page: the Knowledge entry redirects straight into the main Knowledge area, opened on Company Docs with its sources panel.
- In Company Docs, use Upload (with title, type, and language where offered) or New folder to add typed reference material; the list/grid density controls and per-document status apply here as in the rest of the Library.
- Check each document's status in the list. Newly uploaded material is pending and is not used by the assistant until indexing makes it ready; a file that failed processing says "Run Improve understanding before using this file in a question."
- Use Knowledge QnA with a relevant phrase, scoped to "All knowledge (N documents)" or to named files, to inspect ready material and its citations. Customer documents remain in CRM rather than automatically becoming organisation knowledge.
Expected result: Typed organisation sources are ready before retrieval uses them.
Platform operations and organisation access
Screen: /platform
Use case: Operate the platform only with the separate platform role.
Before you begin: Platform superadmin access is required; ordinary organisation users cannot use these procedures.
How to do it
- With platform-superadmin access, choose account menu → Platform. Select Operations → Overview, Organisations, Audit log or Feature visibility.
- In Overview inspect health, pricing coverage and enforcement readiness. Required rates and policies must be ready before enforcement can be enabled; provide an audit reason for a permitted change.
- In Organisations filter and open an organisation. New organisation asks for ID (up to 64 characters), name (120) and initial administrator email; creating it changes platform state.
- Inspect members and invitations. Suspend/reactivate, member seat changes, superadmin grants/revocations and deletion require explicit authority and the requested reason/confirmation.
- Use Audit log filters for operator, organisation, action, outcome and dates. Load older records or Export CSV when authorised.
Expected result: Platform changes are distinguished from ordinary organisation administration.
Platform navigation and controls were inspected read-only. No operator action was executed. Platform role is separate from tenant administrator and owner roles. This walk used organisation accounts only, not a platform-operator account; this section was not re-observed on 2026-09-22 and describes the administered behaviour.
Platform usage, credit policies and finance
Screen: /platform
Use case: Reconcile usage, invoices and recorded payments.
Before you begin: Platform superadmin and authority for the specific financial action are required.
How to do it
- Choose Finance → Usage and cost. Filter date, organisation, provider or model; inspect trend and rows, then export only the needed CSV scope.
- In Credit policies inspect default and organisation limits. Enter the intended monthly cap, hard-stop behavior and audit reason before saving; new rates apply from their effective date; re-rating fills eligible previously unrated usage.
- In Billing choose the organisation. Manage subscription terms, create an invoice draft, and issue or void only when the relevant action is authorised.
- Record a manual payment only from real payment evidence, then allocate it to the intended invoice. Reverse an incorrect allocation with a reason; these records do not execute a bank transfer.
- Use Financials to compare contract revenue, invoicing, receipts, receivables and AI costs. Reconcile currencies and periods before drawing conclusions.
Expected result: Operational finance records are reconciled without inventing payment activity.
Navigation and action labels were observed; finance mutation procedures were checked in source and not executed. This walk used organisation accounts only, not a platform-operator account; this section was not re-observed on 2026-09-22 and describes the administered behaviour.
Platform feedback, session labels and skills
Screen: /platform
Use case: Review product evidence and controlled skill versions.
Before you begin: Platform superadmin access is required.
How to do it
- Choose Quality → User feedback. Filter type, status and handler; open a record to read its message/attachments before assigning it or changing New/In progress/Resolved.
- In Session labels filter organisation, outcome and review status. Open a row, inspect provenance, choose Reviewed or Excluded, provide the required reason (up to 1,000 characters) and Save.
- In Skills inspect definition, inputs/outputs, constraints, model routes and version history. Inspect learned versions and their evidence separately.
- Activate or Retire only an eligible version after reviewing the confirmation. Existing active-version guards may refuse a transition; do not treat a refusal as a reason to bypass it.
Expected result: Feedback and learned behavior are reviewed with their provenance intact.
Read-only production inspection plus deployed-source detail checks; no review status or skill version was changed. This walk used organisation accounts only, not a platform-operator account; this section was not re-observed on 2026-09-22 and describes the administered behaviour.
Feature registration and visibility
Screen: /platform?view=features
Use case: Control which audiences can see a registered feature.
Before you begin: Platform superadmin access and rollout authority are required.
How to do it
- Open Operations → Feature visibility and find the registered feature. Read its current release state and scope.
- Use Register feature only for an approved feature definition, or Edit the intended existing feature.
- Select Developers only, Preview or General, provide the requested reason, and save only the authorised rollout change.
- Recheck visibility for the intended audience. Visibility alone does not prove that a destination or workflow is implemented or working.
Expected result: The feature reaches the intended audience without overstating readiness.
No feature visibility override was changed during this review. This walk used organisation accounts only, not a platform-operator account; this section was not re-observed on 2026-09-22 and describes the administered behaviour.
Label templates in Settings
Screen: /settings/labels
Use case: Fill missing labels from an approved starter template.
Before you begin: Use an account with access to this feature in the correct organisation.
How to do it
- Open Settings → Labels. This opens the shared label manager focused on Industry; use its maintenance controls as described under Customer Management → Labels.
- With Labels write permission, choose Re-seed from template. Confirm you entered from Label sets and choose the source template under Copy from.
- Read the fill-only description: missing values are added; customised, renamed or hidden values are not overwritten and nothing is removed.
- Choose Re-seed only when the template is appropriate. Inspect the added count or Already up to date result, then recheck the label choices.
Expected result: Missing template values are filled without resetting existing customisation.
The page and template dialog were inspected without submitting a re-seed. Other roles may not see this control. This walk used organisation accounts only, not a platform-operator account; this section was not re-observed on 2026-09-22 and describes the administered behaviour.
Publish rates and rate previously unrated usage
Screen: /platform?view=policies
Use case: Maintain separate provider costs and customer credit prices.
Before you begin: Platform superadmin access and approval for the commercial rate are required.
How to do it
- Open Platform → Finance → Credit policies and locate Rates. Review the configured provider/model route and its latest rate version before choosing Publish provider rate or Publish credit rate.
- For a provider rate select CNY, USD or SGD, then enter Input, Cached input and Output prices per million tokens; Reasoning is optional. These are money amounts in the selected currency, not credits.
- For a customer credit rate enter whole credits per million tokens for Input, Cached input and Output, optionally Reasoning, plus Max reservation: the most credits one call may hold before settlement.
- Enter a valid effective date after the latest published version and an audit reason. The form interprets the date at midnight UTC+08:00. Review and Publish only approved prices; the previous version applies until the new date.
- After a successful publication, use refresh recovery if the page failed to reload rather than publishing again. Inspect Current/Scheduled/Superseded status.
- When appropriate, choose Re-rate unrated usage for a published route/window. Review the updated-event count and uncovered events; events outside published windows remain unrated, and already-rated events are not a new rerating target.
Expected result: Provider money costs, customer credits and unrated gaps remain distinguishable.
Detailed rate forms and rerating behavior were checked in deployed source; no rate was published and no usage was rerated. This walk used organisation accounts only, not a platform-operator account; this section was not re-observed on 2026-09-22 and describes the administered behaviour.
Data resilience SLA
Commitment: Atlas commits to 99.9% monthly application availability once the production daily-export schedule and monitoring are accepted. At that same gate, the recovery point objective (RPO) is no more than 24 hours and daily D1 exports are retained for 12 months in private Cloudflare R2 storage.
Before you begin: Check the current production release and incident status; this page describes the commitment and its evidence gates, not proof that a recovery event is underway.
How to interpret the commitment
- Apply 99.9% monthly availability only after the production backup acceptance gate is recorded.
- Use the 24-hour RPO only after that same export and monitoring gate.
- Treat the four-business-hour RTO as inactive until #772 records the timed staging restore.
Platform superadmins monitor this at Platform operations → Production SLA. The dashboard refreshes from five-minute production checks and shows aggregate and pillar health, monthly availability and error-budget use, current daily backup evidence, incident history, and whether the support email and automatic defect report were delivered. At 75% error-budget use the SLA is at risk; at 100% it is breached. Missing scheduled backup evidence is at risk after 04:00 UTC and breached after 06:00 UTC. A failed aggregate health check is a system failure immediately.
When an incident opens, worsens or recovers, Atlas emails [email protected] and creates or updates one matching bug report in Platform Feedback. Recovery leaves that report open until a superadmin verifies the evidence and resolves it.
D1 Time Travel and long-retention exports are different protections: Time Travel provides Cloudflare's short-window point-in-time recovery, while the daily SQL exports provide the separate 12-month inventory. A successful export has a dated manifest with the database identity, completion time, object key, byte count, and independently rechecked SHA-256 checksum. Failed or late runs create an operator alert and never appear as successful backups.
Recovery-time boundary: the proposed four-business-hour recovery time objective (RTO) is not active. It becomes a commitment only after issue #772 records a successful timed staging restore. Atlas has not claimed that drill is complete. A production restore always requires incident approval and a captured rollback bookmark; operators must not restore in place from this page.
Expected result: You can distinguish the accepted availability and backup terms from evidence-gated RPO and RTO promises.
This walk used organisation accounts only, not a platform-operator account; this section was not re-observed on 2026-09-22 and states the administered commitment and its evidence gates.
The Public customer rules walkthrough was checked in production on 25 October 2026. The demonstration 60/7/60-day policy remained inactive and unchanged; the full natural recycling interval was not observed.
Study scope and screenshot provenance
Procedures verified on staging atlas.staging.forth.ai, 22 September 2026, web build 027732e (ref staging), signed in as an owner, an admin, a manager and two reps of one ordinary organisation. That walk was read-only: no decision was accepted, rejected or dismissed, no message was sent or retried, no record or setting was saved, and no paid agent run was started. Visibility differs by role and release settings; sections that need a platform-operator account say so and were not re-observed. Staging advanced from web build c848b7e to 027732e during the walk; the Today screenshots and every quoted Today wording come from 027732e, and the only difference between the two builds is on Today (singular overdue wording, a dropped tier label and a sort fix). Screenshots dated 2026-09-07 come from the earlier production study of atlas.forth.ai at web revision 0af15ad and are kept where the screen is unchanged; screenshots dated 2026-09-22 are staging. One sender address was masked. Destructive, financial and sending procedures are described from the deployed source and were not executed.